Quick Start

Helix Cheat Sheet


Selecting Presets and Setlists
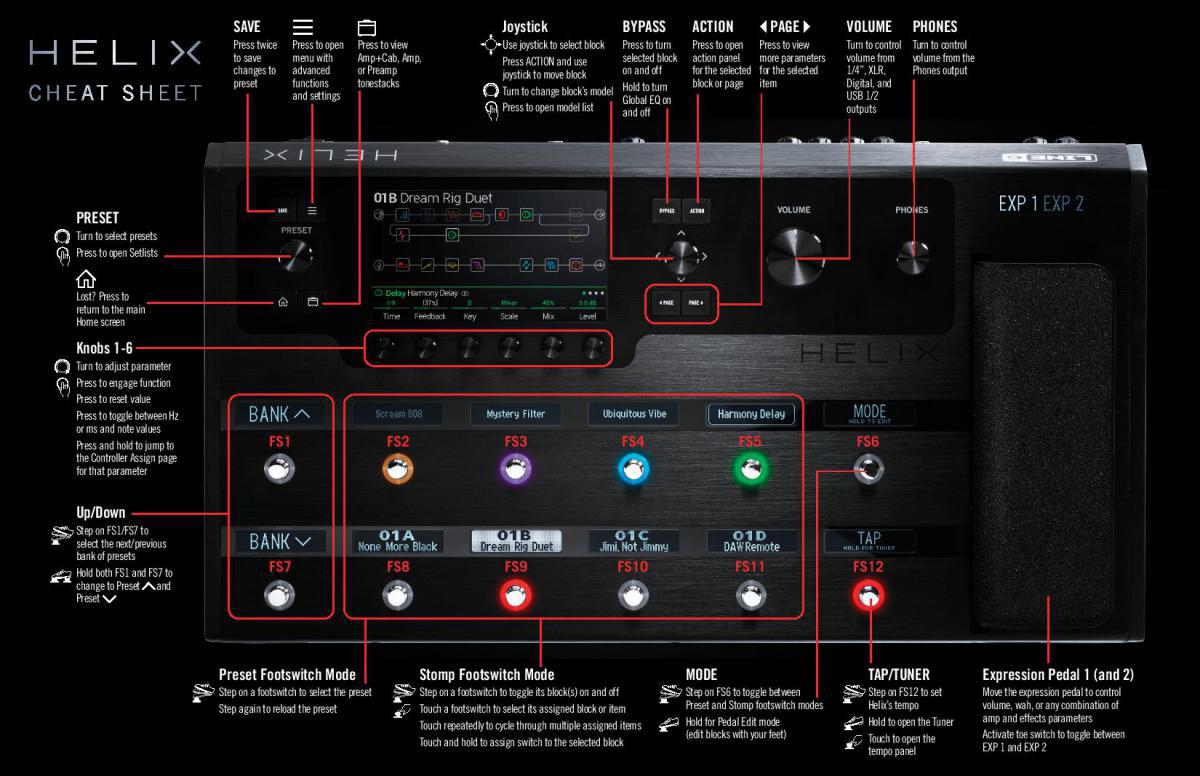
1. Turn PRESET to select presets within the current setlist.
Helix stores eight setlists, each containing 32 banks of four presets (A, B, C, and D). As we promised, no math - that's a grand total of 1,024 preset locations. If that's not enough, your cover band should be asking for more money.
2. Press PRESET to open the Setlist menu:
Navigating the Setlist menu is straight forward:
- Turn the joystick (or move it up and down) to select items in a list.
- From the Setlist column, press the joystick (or move it right) to load its first preset.
- From the Preset column, move the joystick left to go back to the Setlist column.
- Turn Knob 3 (Reorder Preset) to move the selected preset up and down the list.
3. Use the joystick to select Setlist 8 TEMPLATES > Preset 01A
TIP
The dark text above Knob 2 displays the required MIDI messages for recalling the Helix device's setlists, presets, and/or snapshots from external MIDI devices or software. In the illustration above, the FACTORY 1 setlist is recalled with a CC32 message of 007, the 16B Bottle Message preset is recalled with a PC (program change) message of 005, and SNAPSHOT 1 is recalled with a CC69 message of 000.
4. Press HOME to return to the Home screen.
You should see something like this:
Preset Footswitch Mode
Preset mode is used to navigate presets in the current setlist.
1. If not already there, press FS6 (MODE) to select Preset mode. The middle eight switches display two banks of presets and the active preset appears with a red LED ring and white scribble strip:
2. Press BANK or BANK to choose the desired banks.
The banks' presets flash, indicating they're ready to load.
3. Press one of the eight preset switches to load the preset.
NOTE
Footswitch behavior can be customized. See "Global Settings > Footswitches"
Stomp Footswitch Mode
While in Stomp mode, each of the middle eight footswitches can do a number of things:
- Toggle one or more blocks on and off
- Toggle between two values of one or more parameters
- Generate a MIDI, External Amp control, or CV/Expression message
- All of the above, even simultaneously
If not already there, press FS6 (MODE) to select Stomp mode.
The middle eight footswitches display blocks' model names, parameter names, Command Center messages, and/or customized labels:
NOTE
If a switch is assigned to multiple blocks or items, its scribble strip reads "MULTIPLE (X)," where X is the number of assignments, and stepping on the switch turns them all on and off. If some blocks are on and some are bypassed, stepping on the switch toggles each block's bypass state.
NOTE
While in Stomp mode, stepping on BANK or BANK temporarily enters Preset mode. Once you've selected a preset, Helix returns to Stomp mode.
Snapshot Footswitch Mode
Similar to the snapshots feature in some high end digital mixers, each of the Helix device's eight snapshots stores and recalls the state of certain elements in the current preset, including:
- Block Bypass — The bypass (on/off) state of all processing blocks (except Looper), independent of any footswitch assignments. Also see "Snapshots > Block Bypass")
- Parameter Control —The values of any parameters assigned to controllers (up to 64 per preset). Also see "Snapshots > Parameter Control"
- Command Center —The values of any instant MIDI CC, Bank/Prog, MMC, and CV Out messages, plus the state (dim or lit) of any CC Toggle, CV Toggle, and Ext Amp messages. Also see "Command Center" - Tempo —The current system tempo, if "Global Settings > MIDI/Tempo" > Tempo Select is set to "Per Snapshot." (By default, it's set to "Per Preset")
1. Press BANK and BANK simultaneously to enter Snapshot mode.
The middle eight switches flash, indicating a snapshot is ready to be selected.
2. Press one of the eight snapshot switches to select it.
NOTE
Snapshots are powerful enough to warrant their own chapter. See "Snapshots" for more information.
NOTE
If you don't want Snapshot footswitches to disappear after selecting one, set "Global Settings > Footswitches" > Knob 4 (Snapshot Mode Switches) to "Manual Return." In this case, Helix stays in Snapshot footswitch mode until you press FS6 (CANCEL).
Looper Footswitch Mode
Looper mode is only available if a Looper block has been assigned to a footswitch in Stomp mode. Nearly all factory presets in Helix have a Looper block assigned to a footswitch, but your custom presets may not.
| Looper Type | Max. Loop Length (1/2 Speed) | Max. Loop Length (Full Speed) |
|---|---|---|
| Mono | 120 seconds | 60 seconds |
| Stereo | 60 seconds | 30 seconds |
1. From Stomp mode, press the footswitch labeled "Looper" (if available).
Looper mode appears:
NOTE
If you press while loop playback is stopped, this will always record a new loop, and any previous recording will be discarded.
IMPORTANT!
You may change presets while looping, but loop playback will stop unless the preset you select includes the same type of looper block (mono or stereo) on the same path (1 or 2) and is assigned to a footswitch.
NOTE
While in Looper mode, stepping on BANK or BANK temporarily enters Preset mode. Once you've selected a preset, Helix returns to Looper mode.
2. To return to the previous mode, press FS6 (EXIT).
Pedal Edit Mode
Most blocks can be edited without taking your hands off the guitar; if you hate having to reach down and twist knobs, Pedal Edit mode will be your new best friend. Although Pedal Edit is not intended to replace proper controller assignment, in a pinch, it can also be used to tweak one parameter at a time during a performance.
1. Hold FS6 (MODE) for two seconds.
The preset's processing blocks appear on the footswitches, flashing:
If the preset has more than ten processing blocks, you may not see the block you want. Press FS6 (MORE...) one or more times until you do.
NOTE
Selecting a block in Pedal Edit mode has no correlation to any footswitch assignment it may have.
2. Press the footswitch displaying the block you want to edit.
The block's first page of parameters appear at FS1—FS6.
If the block has more than one page of parameters, press FS8 (< PAGE) or FS (PAGE >) until you find the parameter.
3. Press the footswitch displaying the parameter you want to adjust.
Press and hold a Time or Speed switch to toggle between setting the value in ms or Hz and note divisions (1/4-note, dotted 1/8-note, etc.).
4. Use the expression pedal to adjust the parameter.
For fine adjustment, press FS10 (VALUE–) and FS11 (VALUE+). Hold FS (VALUE–) or FS11 (VALUE +) for faster adjustments.
To select a different block, press FS7 (BACK).
5. When finished, press FS12 (EXIT).
If you want to save any changes made to the preset, hold FS12 (EXIT) for two seconds.